Mesh Engine: Partitioning & LOD
A Unity editor extension for partitioning imported meshes, generating LODs, and standardising large-model preparation through repeatable batch workflows.
Overview
Overview
Mesh Engine: Partitioning & LOD helps you prepare large imported models for structured, repeatable use inside Unity.
It is designed for teams working with dense geometry, CAD-derived assets, industrial environments, digital twin scenes, and other technical content that benefits from cleaner structure and more controlled rendering cost.
Included Guides
- Installation and Setup: package contents, import guidance, and first-run setup.
- Quick Start: the fastest route from import to first successful output.
- User Guide: full workflow reference for single-item and batch processing.
- Compatibility and Limitations: supported baselines, project assumptions, and practical boundaries.
- Troubleshooting: common issues, likely causes, and practical fixes.
- Support: how to report issues and what to include.
- Release Notes: package release history.
- Third Party Notices: attribution and licence information for bundled third-party content.
Who It Is For
Mesh Engine is intended for technical Unity users working with:
- CAD-derived and engineering-heavy models
- industrial and facility environments
- digital twin and simulation scenes
- large review scenes that need more structured output and repeatable preparation
What Mesh Engine Does
- Partitions large imported models into manageable generated mesh outputs.
- Generates LOD mesh assets from source meshes.
- Supports both single-item and batch workflows.
- Previews partition layouts in Scene view before generation.
- Writes generated assets into a structured output folder.
- Supports repeatable workflows through settings profiles and reduction profile assets.
Open Mesh Engine
Open Mesh Engine from:
Tools > Infinitus Interactive > Mesh Engine
Supported Source Types
- Scene objects
- Prefabs and FBX model assets
- Mesh assets
Core Workflow Summary
- Choose a source object or model asset.
- Configure partition counts and bounds.
- Preview the partition layout if needed.
- Set mesh output and LOD options.
- Choose a reduction strategy.
- Run
Generate Partitions,Generate LODs, orGenerate Partitions + LODs. - Review the generated assets before using them downstream.
Default Output Behaviour
If no output folder is assigned, Mesh Engine writes generated content under:
Assets/InfinitusInteractive/MeshEngine/Generated/<SourceName>
Generated content may include:
MeshesMaterialsLODPrefabs, when enabled
If Create Scene Hierarchy is enabled, Mesh Engine can also create generated hierarchy objects in the active scene for immediate inspection.
Demo Content
The package includes demo content under:
Assets/InfinitusInteractive/MeshEngine/Demo/
Included scene set:
MeshEngine_Demo_01_ShowcaseMeshEngine_Demo_02_QuickStartMeshEngine_Demo_03_PartitioningLabMeshEngine_Demo_04_LodLabMeshEngine_Demo_05_BatchWorkflow
Use these scenes to review the shipped workflow, sample content, and expected results before applying the tool to production assets.
Product Boundaries
- Mesh Engine is an editor-first workflow tool. The main processing workflow runs in the Unity Editor.
- Results depend on source quality, bounds selection, and reduction settings.
- Mesh Engine helps structure and simplify content, but it does not replace source cleanup, authoring review, or project-specific pipeline validation.
- Review generated outputs before treating them as final production assets.
Section 01
Installation and Setup
What This Package Includes
Mesh Engine ships with:
- the Mesh Engine editor window
- supporting scripts used by the workflow
- bundled documentation and third-party notices
- five demo scenes under
Assets/InfinitusInteractive/MeshEngine/Demo/Scenes - demo source assets and curated generated outputs
Compatibility At A Glance
This version of Mesh Engine was validated in Unity 6000.3.11f1 and is intended for Unity 6 projects.
Later Unity 6 releases and future Unity versions may work, but they have not been validated as part of this package version.
Earlier Unity versions, including pre-Unity 6 releases, are not supported for this release.
Mesh Engine runs inside the Unity Editor:
- assign a source asset or scene object
- configure partitioning, bounds, LOD, and output settings
- generate assets directly inside the Unity project
Import Into A Project
- Import the Mesh Engine asset into your Unity project.
- Let Unity finish script compilation and asset import.
- Confirm the package folder exists at
Assets/InfinitusInteractive/MeshEngine. - Open the documentation landing page if you want the full guide set inside the package.
The package was validated in a Unity 6 project with com.unity.render-pipelines.universal installed.
Mesh Engine does not rely on URP-specific scripting APIs for its core workflow, but demo presentation and fallback materials should still be checked in the render pipeline you intend to ship.
If you use a different render pipeline, validate generated materials and demo presentation in your target project before wider adoption.
Open The Tool
Open Mesh Engine from:
Tools > Infinitus Interactive > Mesh Engine
When the window opens for the first time, you can use the default values for a quick validation pass or create a settings profile immediately if you want repeatable defaults.
Settings Profiles
Mesh Engine supports reusable settings profiles.
You can create one in two ways:
- click
Save Asin theSettings Profilesection of the window - create a profile asset from
Assets > Create > Infinitus Interactive > Mesh Engine > Settings Profile
Settings profiles are useful when:
- your team repeats the same workflow often
- you need different setups for different source types
- you want batch runs to begin from a controlled baseline
Reduction Profile Assets
If the built-in Safe, Normal, and Aggressive options do not fit your content, create a reduction profile asset from:
Assets > Create > Infinitus Interactive > Mesh Engine > Reduction Profile
Use reduction profile assets when you want custom simplification tuning or adaptive heuristics that can be reused across multiple jobs.
First Validation Pass
For a first successful run:
- Open Mesh Engine.
- Assign a source scene object, prefab, FBX model asset, or Mesh asset.
- Leave the output folder empty so Mesh Engine writes to its default generated path.
- Click
Preview Partitionsto inspect the current bounds setup. - Click
Generate Partitions + LODs. - Inspect the generated output under
Assets/InfinitusInteractive/MeshEngine/Generated/<SourceName>.
If you want to validate the package before using your own content, open one of the demo scenes first and inspect the sample outputs there.
Using Mesh Engine In An Existing Project
When importing Mesh Engine into an existing production project:
- choose output folders deliberately so generated assets do not mix with unrelated authoring folders
- confirm whether
Overwrite Existingshould be on or off before large runs - save a settings profile once you have a stable baseline
- validate generated materials and LOD results inside your active render pipeline before wider rollout
Demo Content
Reference scenes are included at:
Assets/InfinitusInteractive/MeshEngine/Demo/Scenes
These scenes are intended to show the shipped workflow and sample content. They do not replace project-specific validation.
Recommended Next Reading
- Quick Start for the fastest route to first output
- User Guide for full control coverage
- Compatibility and Limitations for project assumptions and workflow boundaries
Section 02
Quick Start
Goal
Generate partitioned meshes and LOD assets from a source model as quickly as possible.
Before You Start
- Import Mesh Engine into your project and let Unity finish compiling scripts.
- If this is your first import, read Installation and Setup first.
- Import or open the model you want to process.
- Make sure the model is visible in the Project or Scene.
- If you want a dedicated output location, create or choose a folder in
Assets.
Open Mesh Engine
Open:
Tools > Infinitus Interactive > Mesh Engine

Optional First-Time Setup
If you want repeatable defaults before your first run:
- In
Settings Profile, clickSave Asto create a reusable settings profile. - Optionally create a custom reduction profile from
Assets > Create > Infinitus Interactive > Mesh Engine > Reduction Profile. - Leave the profile unassigned if you only want a one-off validation run.
Fastest Single-Item Workflow
- In the
Sourcesection, assign a scene object, prefab, FBX asset, or Mesh asset. - In
Partitioning, start with a modest chunk count such as4 x 4 x 4. - In
Bounds, keep the default automatic bounds unless you already know you needSelectionBoundsorCustomBounds. - In
Mesh & Output, optionally assign a material override and output folder. - In
LOD, keep the default level settings or adjust percentages and distances. - In
Reduction Strategy, start withNormalor the current settings profile value. - In
Generation Settings, leaveCreate Scene HierarchyandOverwrite Existingenabled for a first validation pass. - Click
Generate Partitions + LODs.
Preview Before Generating
If you want to inspect the partition layout first:
- Open the
Visualisationsection. - Click
Preview Partitions. - Inspect the partition bounds in Scene view.
- Click
Clearto remove the preview.
Preview does not write any assets.
Typical First Settings
These are sensible starting points for a first pass:
- Partitions:
4 x 4 x 4 - Bounds Source:
AutoRendererBounds - LOD Levels:
3 - Reduction Profile:
Normal - Output Folder: leave empty to use the default generated path
- Create Scene Hierarchy:
On - Overwrite Existing:
On
First Batch Workflow
When the single-item run looks correct, move to a multi-source batch workflow:
- Add a second source with
+ Current Source,+ Selection, or drag-and-drop to open the batch queue. - Add any remaining items you want to process in the same run.
- Leave shared settings configured in the window unless a specific item needs an override.
- Choose the batch action and set
Continue On Errorintentionally. - Click
Run Batch.
After Generation
Check the generated output folder for:
- partition meshes
- generated materials
- generated LOD mesh assets
- prefabs, if enabled
If Create Scene Hierarchy is enabled, inspect the generated objects in the current scene as well.
If The First Result Is Not Right
- Adjust partition counts if meshes are too coarse or too fragmented.
- Use
Preview Partitionsto confirm the bounds volume. - Switch bounds source if automatic bounds are not appropriate.
- Re-run with a safer or more aggressive reduction profile depending on the result.
- Review Compatibility and Limitations and Troubleshooting for follow-up guidance.
What To Read Next
- User Guide for the full control breakdown
- Compatibility and Limitations for project assumptions and boundaries
- Troubleshooting if the first pass fails or the output is not behaving as expected
Section 03
User Guide
Overview
Mesh Engine supports two primary workflows:
- Single mode for working on one source at a time
- Batch workflow for processing multiple sources with shared settings
The editor window also supports Basic and Advanced panel states.
- Basic mode surfaces the essential workflow controls.
- Advanced mode exposes finer control over partitioning, bounds handling, reduction behaviour, and output settings.
Core Concepts
Before using Mesh Engine heavily, it helps to keep these terms in mind:
Source: the scene object, prefab, FBX model asset, or Mesh asset you want to processPartitions: generated mesh chunks created from the source based on bounds and chunk countsLOD assets: simplified mesh variants generated from source meshes or partition meshesSettings profile: a ScriptableObject that stores the current Mesh Engine configurationReduction profile asset: a ScriptableObject that stores custom simplification tuning and adaptive heuristics
Open Mesh Engine
Open:
Tools > Infinitus Interactive > Mesh Engine
Settings Profile Workflow
The Settings Profile section lets you save and restore repeatable Mesh Engine setups.
Use it when:
- the same team needs consistent defaults
- you switch between very different source types
- you want a stable baseline for repeated batch runs
Available actions:
Load: load all settings from the selected profile.Save: write the current window state back into the selected profile.Save As: create a new settings profile from the current settings and assign it.Reset All: reset the Mesh Engine window to default values without deleting assets.
Settings profiles can also be created from:
Assets > Create > Infinitus Interactive > Mesh Engine > Settings Profile
A settings profile stores partitioning, bounds, LOD, reduction, output, preview, and batch defaults so the workflow can be repeated more reliably.
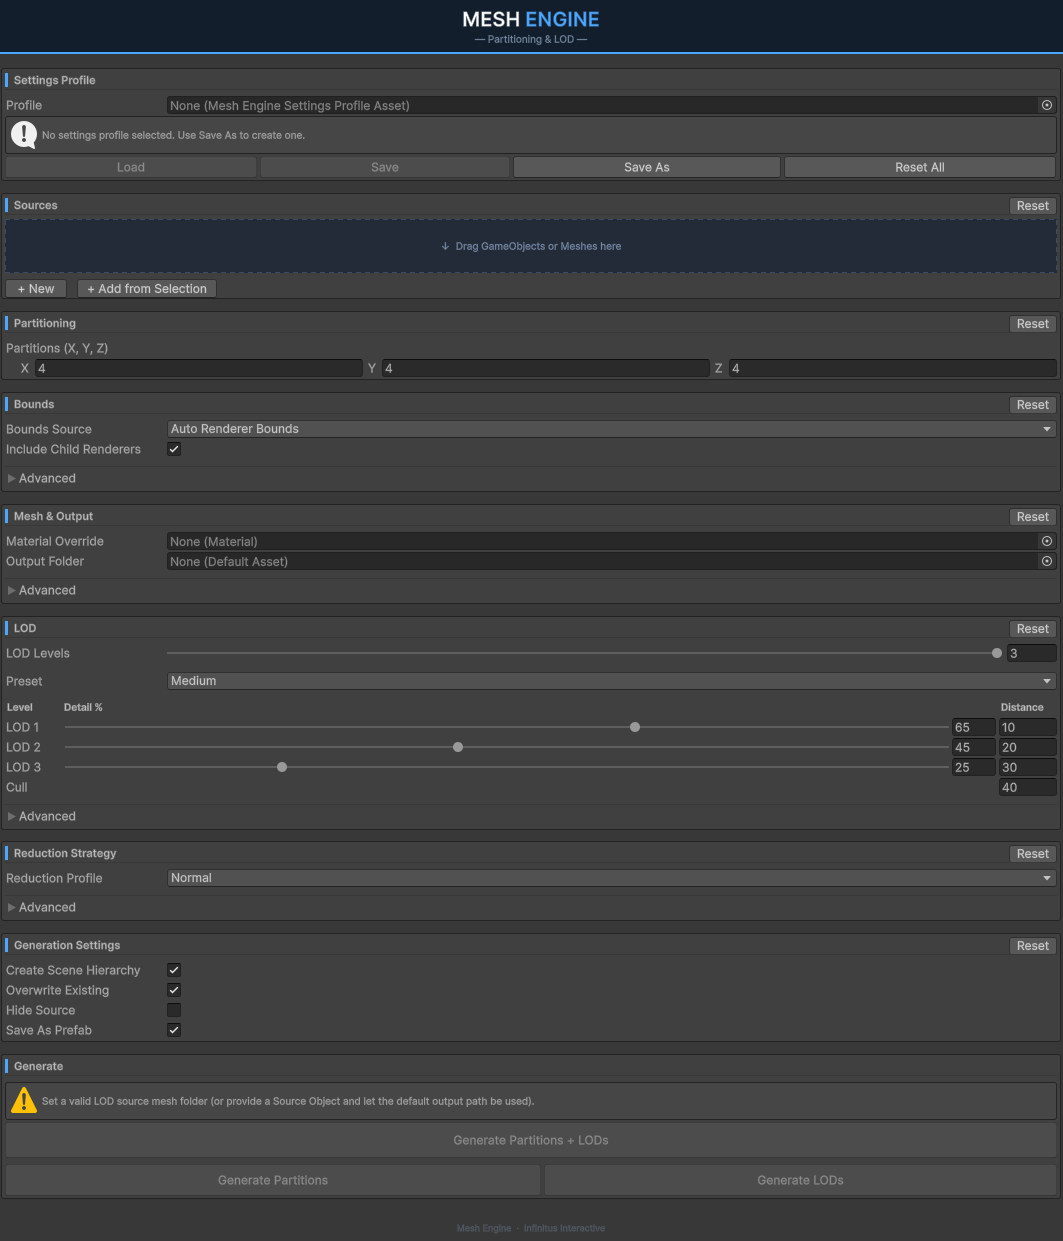
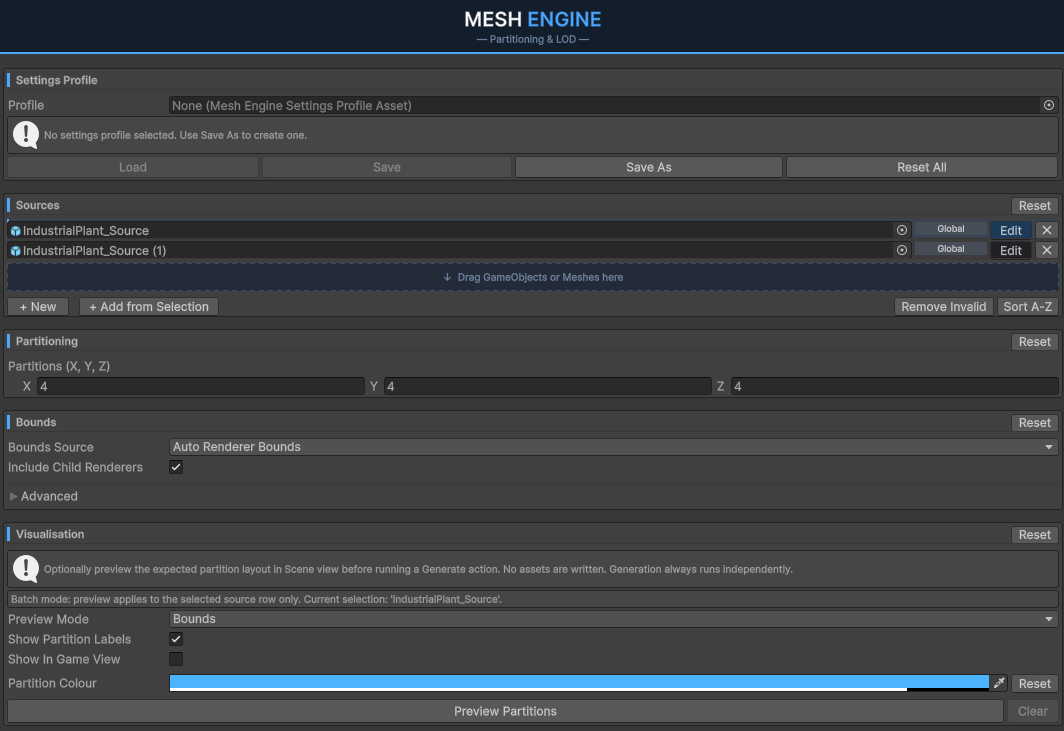
Editor Sections
Source
Assign the input object here.
Supported sources:
- Scene objects
- Prefabs and FBX model assets
- Mesh assets
If no source is assigned, generation cannot start.
Partitioning
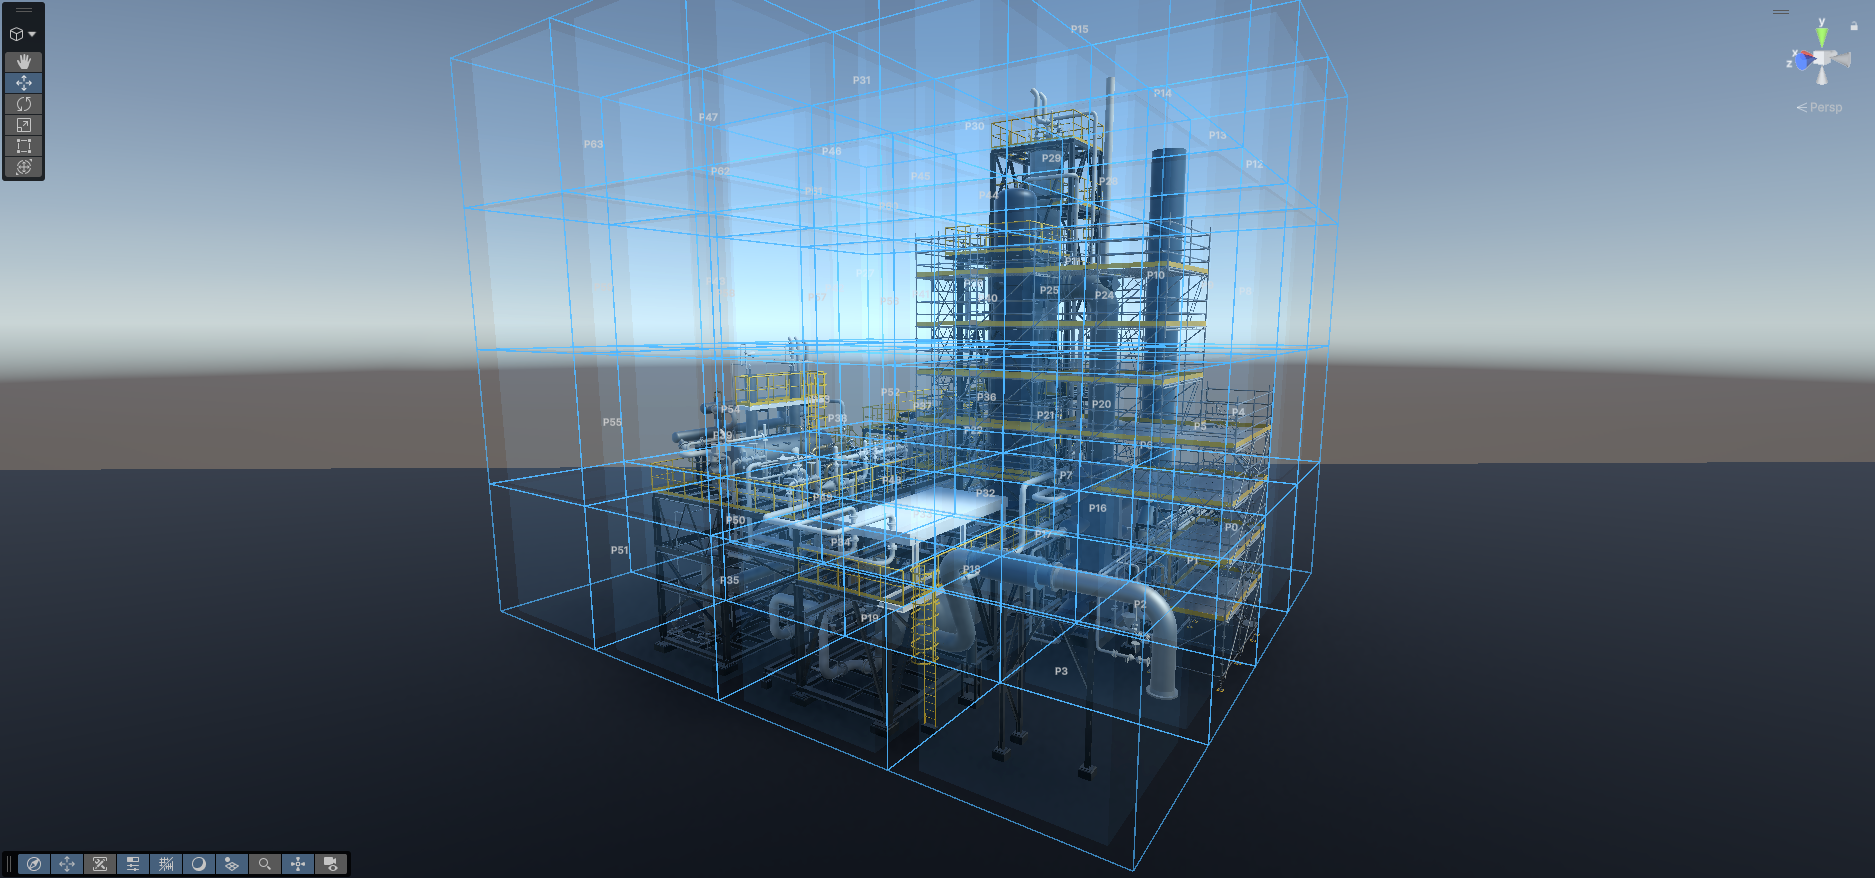
Set the number of partitions to create across X, Y, and Z.
Mesh Engine uses triangle-based partitioning to distribute geometry across partitions. This is especially useful for monolithic meshes and denser sources where cleaner redistribution matters.
General guidance:
- use lower partition counts for broad first passes
- increase partition counts only when the output still feels too coarse
- validate chunking visually before committing to large runs
Bounds
Controls how the partition volume is calculated.
Available bounds sources:
AutoRendererBounds: computes bounds from the source renderersSelectionBounds: computes bounds from a chosen root object and its child renderersCustomBounds: uses a manually entered centre and size
Advanced options include:
- expanding bounds to child renderers
- adding bounds padding
- outlier handling for stray geometry or distant CAD components
Use SelectionBounds when the full source root contains extra content you do not want included. Use CustomBounds when you need direct manual control.
Visualisation
Use this section to preview the expected partition layout in Scene view before generation.
Key points:
- preview does not write assets
- partition labels can be shown or hidden
- preview can be shown in Game View if you enable it
- partition colour can be changed and reset
Use Preview Partitions before large jobs or when testing custom bounds and outlier handling.
Mesh & Output
Use this section to control generated mesh behaviour and output location.
Options include:
- index format
- material override
- source material colour filtering when no override material is assigned
- output folder
If no output folder is assigned, Mesh Engine writes to:
Assets/InfinitusInteractive/MeshEngine/Generated/<SourceName>
Important behaviour:
- if
Material Overrideis assigned, source colour filtering is ignored - if no override is assigned, copied materials can be colour-filtered to make partitions easier to distinguish
LOD
Set how many LOD levels to generate and define the detail percentages and transition distances.
Basic mode:
- exposes a simpler preset-oriented workflow
Advanced mode:
- exposes detailed LOD percentages and distances
- exposes custom mesh source and LOD output folders
Recommendations:
- keep LOD distances increasing by level
- keep cull distance greater than the last LOD distance
- validate silhouette quality before pushing percentages too low

Reduction Strategy
Controls how aggressively Mesh Engine reduces geometry during LOD generation.
Built-in profile options:
- Safe
- Normal
- Aggressive
Advanced mode also supports:
- an optional profile asset
- custom reduction levels
- topology safety
- mesh optimisation pass
- secondary UV generation for non-skinned meshes
Mesh reduction profile assets can be created from:
Assets > Create > Infinitus Interactive > Mesh Engine > Reduction Profile
Use a profile asset when you need repeatable tuning across multiple assets or custom named levels beyond the built-in presets.
Generation Settings
Controls how the results are written back into the project and scene.
Options include:
Create Scene Hierarchy: creates generated partition and LOD objects in the active scene so results can be inspected immediatelyOverwrite Existing: replaces matching generated assets instead of creating numbered duplicatesHide Source: disables the original scene object after generation when a scene hierarchy is createdSave As Prefab: saves the generated hierarchy root as a prefab in the output folder structure
When Create Scene Hierarchy is disabled, scene-only options such as Hide Source and Save As Prefab are not relevant.
Generate
Single mode provides three actions:
Generate Partitions + LODsGenerate PartitionsGenerate LODs
Use Generate Partitions + LODs for the standard full workflow.
Recommended Single-Source Workflow
- Assign the source.
- Set a conservative partition count.
- Confirm bounds and preview partitions.
- Choose output and material behaviour.
- Set LOD count, percentages, and reduction strategy.
- Review generation settings before writing assets.
- Generate.
- Inspect the output folder and any generated hierarchy.
- Iterate before using the result in production content.
Batch Workflow
Add multiple sources when you want to process them in a single batch run. Mesh Engine exposes the batch queue automatically when more than one source is present.
Queue
Add items to the queue by:
- using
+ Current Source - using
+ Selection - dragging GameObjects or Mesh assets into the queue area
All queued items use the shared Mesh Engine settings configured in the window unless you enable per-item overrides.
Shared Batch Controls
Before running the queue, set:
- the batch action: partitions only, LODs only, or partitions plus LODs
- whether batch processing should continue after an error
Then click Run Batch.
Per-Item Overrides
Batch items can override three categories independently:
Mesh OutputLODGeneration
Use overrides when one item needs a different output folder, material override, LOD setup, or generation behaviour than the rest of the queue. Keep overrides limited unless they are part of a deliberate comparison or production workflow.
Generated Results
Depending on your settings, Mesh Engine may create:
- generated partition meshes
- generated materials
- generated LOD mesh assets
- scene hierarchy objects
- prefabs
By default, these outputs are organised under the Mesh Engine Generated folder. If you choose a custom output location, keep it inside Assets so Unity can import the results correctly.
If Overwrite Existing is disabled, Mesh Engine preserves earlier outputs and creates unique asset paths instead of replacing matching files.
Choosing The Right Workflow
Use partition generation when:
- the source is large and difficult to manage as a single mesh or hierarchy
- you need more structured output for downstream work
- you want to isolate areas for inspection, streaming, or review
Use LOD generation when:
- you already have source meshes and need reduced-detail versions
- you want to control rendering cost more effectively across a large scene
- you want repeatable fidelity tradeoffs instead of one-off manual optimisation
Use both together when:
- you are preparing a large imported model for a more production-ready Unity workflow
- the source needs both structural organisation and reduced-detail variants
Best Practices
- Start conservative, then increase partition density or reduction aggressiveness only after inspection.
- Use
Preview Partitionsbefore committing large outputs. - Save settings profiles for repeated workflows instead of rebuilding window state by hand.
- Validate generated materials if your project uses a custom render pipeline or strict material standards.
- Review the generated hierarchy and prefab naming before committing outputs into version control.
Notes On Results
Results depend on the quality and structure of the source content. Dense imported models, overlapping surfaces, distant outlier geometry, or inconsistent material setups may require iteration in partitioning and reduction settings.
For project assumptions and workflow boundaries, read Compatibility and Limitations. For failure cases and fixes, read Troubleshooting.
Section 04
Compatibility and Limitations
Compatibility Baseline
Mesh Engine version 1.0.0 was validated in Unity 6000.3.11f1 and is intended for Unity 6 projects.
Later Unity 6 releases and future Unity versions may work, but they have not been validated as part of this package version.
Earlier Unity versions, including pre-Unity 6 releases, are not supported for this release.
The intended editor operating systems for this version are:
- Windows
- macOS
Mesh Engine is primarily an editor workflow tool. Its core processing path runs inside the Unity Editor and writes assets back into the project.
Supported source types:
- scene objects
- prefabs and FBX model assets
- Mesh assets
Render Pipeline Notes
Mesh Engine includes preview and rendering support for both built-in and scriptable render pipeline camera paths.
The package was validated in a Unity 6 project with com.unity.render-pipelines.universal installed.
Mesh Engine does not rely on URP-specific scripting APIs for its core workflow, but bundled demos and fallback material behaviour should still be validated in the render pipeline you intend to ship.
For generated fallback materials, the package attempts shader lookup in this order:
Universal Render Pipeline/LitHDRP/LitStandardUnlit/ColorSprites/Default
In practice:
- built-in, URP, and HDRP projects have a clearer default path
- custom render pipelines or aggressively stripped shader sets should be validated before relying on generated fallback materials
- projects without URP installed should validate demo presentation and fallback materials before production use
Best-Fit Source Content
Mesh Engine is best suited to:
- dense imported models
- CAD-derived content
- industrial, facility, and technical environments
- scenes where structure, repeatability, and practical rendering cost matter
What Mesh Engine Does Not Do
Mesh Engine is not intended to be:
- a CAD import pipeline replacement
- a fully automatic cleanup or remeshing system
- a guarantee of optimal settings for every model
- a substitute for manual review of generated results
- a runtime optimisation framework driven by in-game processing
Known Workflow Limitations
- Results depend heavily on source quality and hierarchy structure.
- Incorrect bounds or stray geometry can distort partitioning until you adjust bounds or outlier handling.
- LOD generation requires a valid mesh folder containing actual mesh assets.
Material Overridetakes precedence over source colour filtering.Overwrite Existingcan replace matching outputs intentionally; disabling it creates additional assets instead.- Batch processing shares global settings unless you enable explicit per-item overrides.
Validation Recommendations
Before using Mesh Engine on project-critical content:
- test on a representative source asset first
- confirm generated materials behave correctly in your render pipeline
- inspect scene hierarchy and prefab outputs before committing them to version control
- save a settings profile once you have a stable workflow baseline
When To Expect Iteration
Expect additional tuning when the source contains:
- distant outlier geometry
- overlapping or messy CAD-derived meshes
- inconsistent material setups
- very small details that break down under aggressive reduction
In these cases, start with preview, settings profiles, and more conservative reduction rather than trying to solve everything in one pass.
Section 05
Troubleshooting
Nothing Happens When I Try To Generate
Check:
- a valid source is assigned
- partition counts are greater than zero on all axes
- LOD source settings are valid if you are generating LODs only
- the output folder is inside
Assetsif you are assigning one manually
If the batch queue is visible, also confirm it contains valid items and that the selected batch action matches the result you expect.
Preview Does Not Appear
Check:
- a valid source is assigned
- the current settings are ready for partitioning
- Scene view is open if you expect preview overlays there
- the preview was not cleared immediately after generation or a settings reset
Try this:
- click
Preview Partitionsagain after changing bounds or source selection - toggle partition labels or preview colour to make the overlay easier to read
- if using a custom or stripped render pipeline, verify that preview rendering is visible in your project setup
My Partitions Look Wrong
Possible causes:
- the bounds volume does not match the intended part of the model
- partition counts are too low or too high for the source
- the source contains distant stray geometry or misplaced CAD elements
Try this:
- use
Preview Partitionsfirst - switch
Bounds Source - add or reduce
Bounds Padding - enable outlier handling in Advanced mode
- test
Triangle Partitioningfor monolithic meshes
All Geometry Was Excluded By Outlier Handling
This means the current outlier settings rejected every candidate renderer.
Try this:
- disable outlier handling temporarily
- increase the cluster distance value if you are using
Keep Largest Cluster - re-check the source hierarchy to make sure the intended geometry is grouped as expected
The Tool Includes Geometry I Did Not Expect
This usually means the computed bounds still include parts of the source you do not want.
Try this:
- use
SelectionBoundswith a more specific root object - use
CustomBoundsfor full manual control - enable outlier handling if distant geometry should be ignored
Generated Results Are Too Fragmented
Try this:
- reduce the partition count
- re-check the bounds volume
- increase bounds padding slightly if border areas are being split too aggressively
No Meshes Are Found For LOD Generation
LOD generation requires a valid mesh folder containing imported or generated mesh assets.
Check:
- the source mesh folder exists
- the folder actually contains
Meshassets - you are not pointing LOD generation at an empty output location
Try this:
- generate partitions first if you intend to create LODs from partition meshes
- reassign the mesh folder in advanced LOD settings when using a custom workflow
LOD Results Are Too Aggressive
Try this:
- increase the detail percentages for each LOD level
- use a safer reduction profile
- enable topology safety where appropriate
- use or create a profile asset with more conservative settings
LOD Results Are Not Reducing Enough
Try this:
- lower the detail percentages
- use a more aggressive reduction profile
- use a profile asset with stronger reduction tuning
Distances Or Culling Behave Strangely
Check the LOD distances:
- LOD distances should increase by level
- Cull distance should be greater than the last LOD distance
If the distances are not increasing correctly, update the values and regenerate.
Materials Do Not Look As Expected
Check:
- if a material override is assigned, source material filtering is ignored
- if no material override is assigned, source material filtering may affect copied materials
Try this:
- assign an explicit material override if you want consistency
- disable source material filtering if you want the copied source look to remain closer to the original
Generated Materials Look Like Fallback Materials
If a source material cannot be reused as expected, Mesh Engine may fall back to a default material path.
Try this:
- assign an explicit material override for predictable results
- verify that the target render pipeline shaders exist in the project
- re-check the generated materials folder before assuming the scene hierarchy result is final
Existing Generated Assets Are Not Being Replaced
Check whether Overwrite Existing is enabled in Generation Settings.
If it is disabled, Mesh Engine creates additional assets instead of replacing matching outputs.
Batch Processing Stops Early
Check whether Continue On Error is enabled for the current batch run.
If it is disabled, the batch may stop after the first failing item.
Also check whether one queue item has an invalid override, mesh folder, or output folder.
Hide Source Or Save As Prefab Is Not Available
These options depend on Create Scene Hierarchy.
If hierarchy creation is disabled, scene-only follow-up options are not applicable.
Settings Profile Is Not In Sync
If the profile status shows unsaved changes, the current window state no longer matches the selected settings profile.
Use:
Loadto restore the saved profile valuesSaveto update the selected profile from the current window stateSave Asto preserve the current setup as a separate profile
I Need More Help
If the issue persists after working through the documentation, review Support for reporting guidance and the information to include in a request.
Section 06
Support
Start Here
Before raising a support request, work through the documentation in this order:
- Installation and Setup
- Quick Start
- User Guide
- Compatibility and Limitations
- Troubleshooting
If your question concerns third-party content or attribution, also review Third Party Notices.
Where To Raise Issues
For Mesh Engine support, contact:
support@teaminfinitus.com
If you received Mesh Engine directly from Infinitus Interactive as part of a project, evaluation, or private delivery and were given a different support route, use that agreed contact instead.
What To Include In A Support Request
Include as much of the following as possible:
- Unity version
- active render pipeline
- operating system
- whether the source is a scene object, prefab, FBX asset, or Mesh asset
- the exact Mesh Engine action you ran
- whether
Create Scene Hierarchy,Overwrite Existing, orContinue On Errorwere enabled - whether batch overrides were involved
- the output folder path you used
- screenshots of the Mesh Engine window and the unexpected result
- relevant console warnings or error text
Helpful Reproduction Steps
Support is easier to resolve when you can provide:
- the smallest source asset that still reproduces the problem
- a short list of exact steps from source selection to failure
- whether the same issue occurs in one of the demo scenes or only in your own content
Fast Triage Categories
When writing a report, describe it as one of these first:
- import or setup issue
- partitioning or bounds issue
- LOD quality or distance issue
- batch workflow issue
- material or output issue
- documentation or packaging issue
Support Scope
Mesh Engine support is best suited to:
- package import and setup issues
- documented editor workflow questions
- demo and sample-content questions
- unexpected behaviour inside the main Mesh Engine workflow
Support is not a substitute for broader pipeline design, source-model repair, or legal advice beyond the notices included with the package.
Section 07
Release Notes
2026-04-02 - Version 1.0.0
This release establishes the first public documentation baseline for Mesh Engine.
Included in this release:
- documentation landing page
- installation and setup guide
- quick start guide
- full user guide
- compatibility and limitations guide
- troubleshooting coverage
- support guidance, including the support contact route
- package release notes structure
- consolidated third-party notice coverage for bundled demo source content
Package Reference Content
The package includes:
- five demo scenes
- redistributable demo source assets with local attribution files
- curated generated sample outputs
- package-level third-party notices
Future release notes will appear above this entry.
Section 08
Third Party Notices
Mesh Engine includes third-party code and third-party demo source content used as part of the packaged release.
At the time of release, the bundled third-party material includes:
- UnityMeshSimplifier source code used for LOD generation
- Plant-3 by MEC CAD, used as the source lineage for the bundled IndustrialPlant demo content
- City 3D Model by Optic Idealist, used as the bundled city source asset for Demo 03
UnityMeshSimplifier
Portions of Mesh Engine include code from UnityMeshSimplifier.
The included source files retain their own licence headers and attribution notices.
Relevant source folder:
Assets/InfinitusInteractive/MeshEngine/Scripts/Runtime/UnityMeshSimplifier
Included licence: MIT
Copyright:
Copyright (c) 2017-2020 Mattias Edlund
Original upstream references noted in source include material based on Fast Quadric Mesh Simplification by Sven Forstmann.
Demo Source Asset: Plant-3
Demo source content includes Plant-3 by MEC CAD.
Original source:
https://skfb.ly/6Rn69
Included licence: Creative Commons Attribution 4.0 International (CC BY 4.0)
Licence URL:
https://creativecommons.org/licenses/by/4.0/
Packaged usage:
- source lineage for the bundled IndustrialPlant demo content
- covers the Demo 05 approved plant-derived module, pump skid, pipe rack, and valve cluster content
- no separate third-party download is bundled specifically for Demo 05
Required credit:
"Plant-3" (https://skfb.ly/6Rn69) by MEC CAD is licensed under Creative Commons Attribution 4.0 International (https://creativecommons.org/licenses/by/4.0/).
Relevant demo source folder:
Assets/InfinitusInteractive/MeshEngine/Demo/Source/Plant
Local asset-specific attribution:
Assets/InfinitusInteractive/MeshEngine/Demo/Source/Plant/ATTRIBUTION.txt
Demo Source Asset: City 3D Model
Demo source content includes City 3D Model by Optic Idealist.
Original source:
https://www.fab.com/listings/2948a34f-3fbe-4cf9-aa73-7a477efd83a8
Included licence: Creative Commons Attribution 4.0 International (CC BY 4.0)
Licence URL:
https://creativecommons.org/licenses/by/4.0/
Packaged usage:
- bundled city source asset used for the Demo 03 Partitioning Lab content
Required credit:
"City 3D Model" (https://www.fab.com/listings/2948a34f-3fbe-4cf9-aa73-7a477efd83a8) by Optic Idealist is licensed under Creative Commons Attribution 4.0 International (https://creativecommons.org/licenses/by/4.0/).
Relevant demo source folder:
Assets/InfinitusInteractive/MeshEngine/Demo/Source/City
Local asset-specific attribution:
Assets/InfinitusInteractive/MeshEngine/Demo/Source/City/ATTRIBUTION.txt
MIT Licence Notice
Permission is hereby granted, free of charge, to any person obtaining a copy of this software and associated documentation files, to deal in the software without restriction, including without limitation the rights to use, copy, modify, merge, publish, distribute, sublicense, and or sell copies of the software, and to permit persons to whom the software is furnished to do so, subject to the following conditions:
The above copyright notice and this permission notice shall be included in all copies or substantial portions of the software.
The software is provided "as is", without warranty of any kind, express or implied, including but not limited to the warranties of merchantability, fitness for a particular purpose and non-infringement. In no event shall the authors or copyright holders be liable for any claim, damages, or other liability, whether in an action of contract, tort, or otherwise, arising from, out of, or in connection with the software or the use or other dealings in the software.
Practical Note
This notice is included to make bundled attribution easier to review at package level. Bundled demo source assets also retain their own ATTRIBUTION.txt files under Assets/InfinitusInteractive/MeshEngine/Demo/Source, and included source files should be retained with their original licence headers.
Next Step
Interested in where Mesh Engine: Partitioning & LOD is heading?
Read through the documentation, then get in touch if you want to discuss the roadmap, the workflow fit, or a custom implementation around similar systems.
Tell us about the project
A short description of the problem, the context, and what you need to achieve is enough to get started.
We scope it together
We will map the constraints, define what is realistic, and put together a build plan that can actually be delivered.
We build and ship it
Production-grade delivery with clear communication throughout. One team, one build, no gaps in between.